Using large images as a prominent design element on web pages continues to be a popular web design trend today. Unfortunately, images also increase the size of your web pages and, on average, make up about half of its “weight”. If it takes too long for a website to load, it is very likely that images/photographs used on the site are not properly optimized, and could cause users to quickly navigate away from your site. Optimizing your images will reduce your website’s page loading times, reduce bandwidth, and improve the browsing experience for visitors.
What Does “Optimizing Images” Mean?
If you have a landing page with a 800KB image,the page is going to take longer to load than if you used a 50KB image. Images hold data other than just the pixels we see on the screen and this data can add unnecessary size to the image. Optimizing images means the file size of an image is reduced/compressed from the original source file to a size and quality setting that is visually acceptable to use in a web page. Optimizing your images can drastically improve your site’s performance. While it may not be noticeable on a page with one or two images, with web pages that have multiple images, it can make a huge difference.
Image Optimization Tools
Resizing the resolution of your web image is the first step to optimization. The best way to decrease your image’s file size while maintaining its visual aesthetics (e.g. not making it look like a pixelated monster) is to use Adobe Photoshop. I know that not everyone has Photoshop, but thankfully there are a number of other great free tools out there that can help you optimize images easily.
If you’re not currently using an optimization tool, I would urge you to choose one. I have always used Photoshop for many years, but started using ImageOptim (for OS X) recently and have seen a saving an average of 10-20% in file sizes. This may not sound like a lot, but over the course of time that is gigabytes of saved bandwidth. ImageOptim’s interface (GUI) is very simplistic, which is something I love about it, and it also compresses images very quickly.
Here are some other great tools you can use:
For (OS X): Imagealpha, JPEGMini, Pixlr , FastImageresize, TinyPNG
For (Windows): RIOT, PNGOUT, Free Image Optimizer, FastImageresize, TinyPNG
File Formats
Graphic applications allow you to save images in a number of different file formats. The most commonly used file formats online are JPEG and PNG. JPEGs are better suited for photographs as they contain many colors. The format uses compression in order to reduce file size. PNGs, on the other hand, are more suited to screenshots and website design images, such as icons and buttons. This is due to the fact that PNGs use a lossless compression technique so the quality is higher. However, this also results in larger file sizes.
These are the file types I typically use:
- Photos: JPEG, PNG-24
- Low complexity (few colors): GIF, PNG-8
- Low complexity with transparency: GIF, PNG-8
- High complexity with transparency: PNG-24
- Line art: SVG
Things To Remember When Optimizing Your Images
- Optimizing your images will reduce file size, but it will also affect the quality of the image. Quality can also be notably reduced if you compress an image too much. It is therefore important to get the balance between image quality and image file size right.
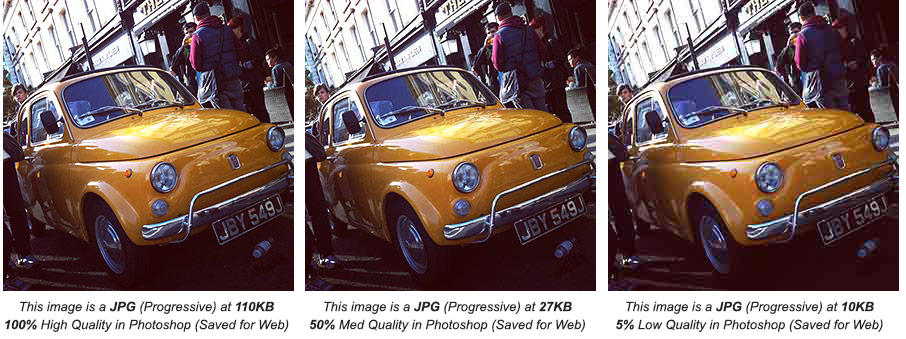
- Most graphical editing applications like Photoshop allow you to reduce the quality of an image for the web. Use the “Save for Web” option to help reduce file sizes of JPEGs, PNGs, or GIFs. (File > Save for Web and Devices). If you are saving your file as a JPEG, don’t forget to save it as “progressive” for a much better compression.
- Make sure that your images are 72 ppi (resolution). Do not upload images at a resolution of 300 ppi, as this makes for huge file sizes and slow loading times, and it isn’t necessary for on-screen images.
- PNGs are almost always superior to GIFs and are usually the best choice.
- Use GIFs for very small simple graphics (e.g. less than 10×10 pixels, or a color palette of less than 3 colors) and for animated images.
- Use JPEGs for all photographic-style images. Do not use BMPs or TIFFs.
- Reduce the white space around images. Some developers use whitespace for padding- which is a big no no. Crop your images to remove any white space around the image and use CSS to provide padding.
- Use proper file formats. If you have icons, bullets, or any graphics that don’t have too many colors, use a format such as GIF or PNG-8 and save the file with lower amounts of colors.
- Make sure your image’s Alt text description is properly labeled. If the image for some reason doesn’t load or a user has images turned off, Alt text would appear in that place, and should accurately describe what the missing image looks like.
- Lastly, after reducing your photos and image sizes, don’t forget to use proper file names for all your images. Proper file names help search engines “see” what is on the image to make sure that images will display in search results. If we name our photo IMG_1234.jpg or DSC1100.jpg, search engines would not understand what this image is about and they wouldn’t be able to index it properly. Rename your images to be more descriptive and reflective of keywords within the content of your website.
(IMG_1234.jpg vs 1970-Fiat-500-Sedan.jpg)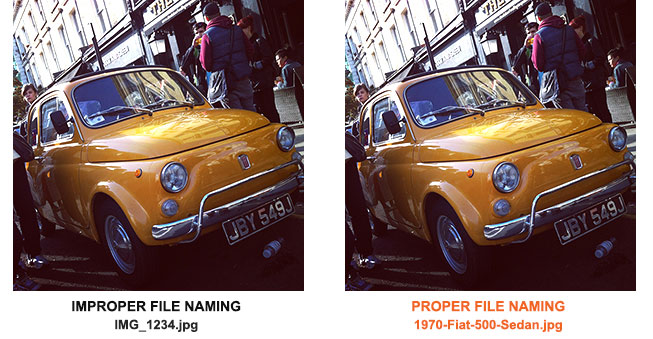
Optimizing your images with these tips in mind can yield great benefits for your website’s loading times, browsing experience, and SEO. Although I understand that it can take a while to shrink and replace all of the images on your site, at the end of the day, it’s always important to keep your eye on the prize! Optimized images are a major stepping stone on the path to a faster site, which translates to a happier visitor.
Resources: